
I wanted to give a tutorial on how to create a personal website or blog using a Content Management System (CMS). This is how I created and how I am maintaining this blog. First I want to show how to easily create content using Hugo the CMS I am using. Then I want to describe how to host it in a cost efficient way on AWS S3. Finally, how to add and maintain its content in a very neat way by setting up Continuous Deployment.
1. Creating Content
In this tutorial I will use Hugo, a CMS written in Golang. The first step is to install hugo, you can follow the steps here [1]. On MacOS
brew install hugo
Then create a new site
hugo new site mypersonalwebsite
This creates a new folder mypersonalwebsite with some defaults to get started. Now let’s get GIT setup
cd my personalwebsite
git init
git remote add origin git@github.com:sduc/sduc-web.git
I am adding a Github repo as remote.
Create a .gitignore with the following content
# Hugo default output directory
/public

## OS Files
# Windows
Thumbs.db
ehthumbs.db
Desktop.ini
$RECYCLE.BIN/

# OSX
.DS_Store
Now I recommend getting a theme for simplicity. Themes can be found here. I am using the AllinOne theme.
git submodule add https://github.com/orianna-zzo/AllinOne.git themes/AllinOne
echo 'theme = "AllinOne"' >> config.toml
From now on it is very dependent on how the theme is setup. In the case of AllinOne, there is an example coming with which should help to get started.
To check locally how the website is looking
hugo server -D
This will start a local server which should be server on the following url: http://localhost:1313
In order to generate the site content, you need to run
hugo
Which will generate the output in folder public.
2. Hosting
I am hosting this website on AWS. Since the content is static, everything is served from S3. The advantage is that it is very cheap to host on S3. For the Domain Name, I am also using Route 53. I will not explain how to setup an AWS account therefore I am assuming that you have already created one.
Registering a new Domain Name
First let us get a domain name for our public personal website. On the AWS console navigate to the Route 53 service and register a new Domain Name.
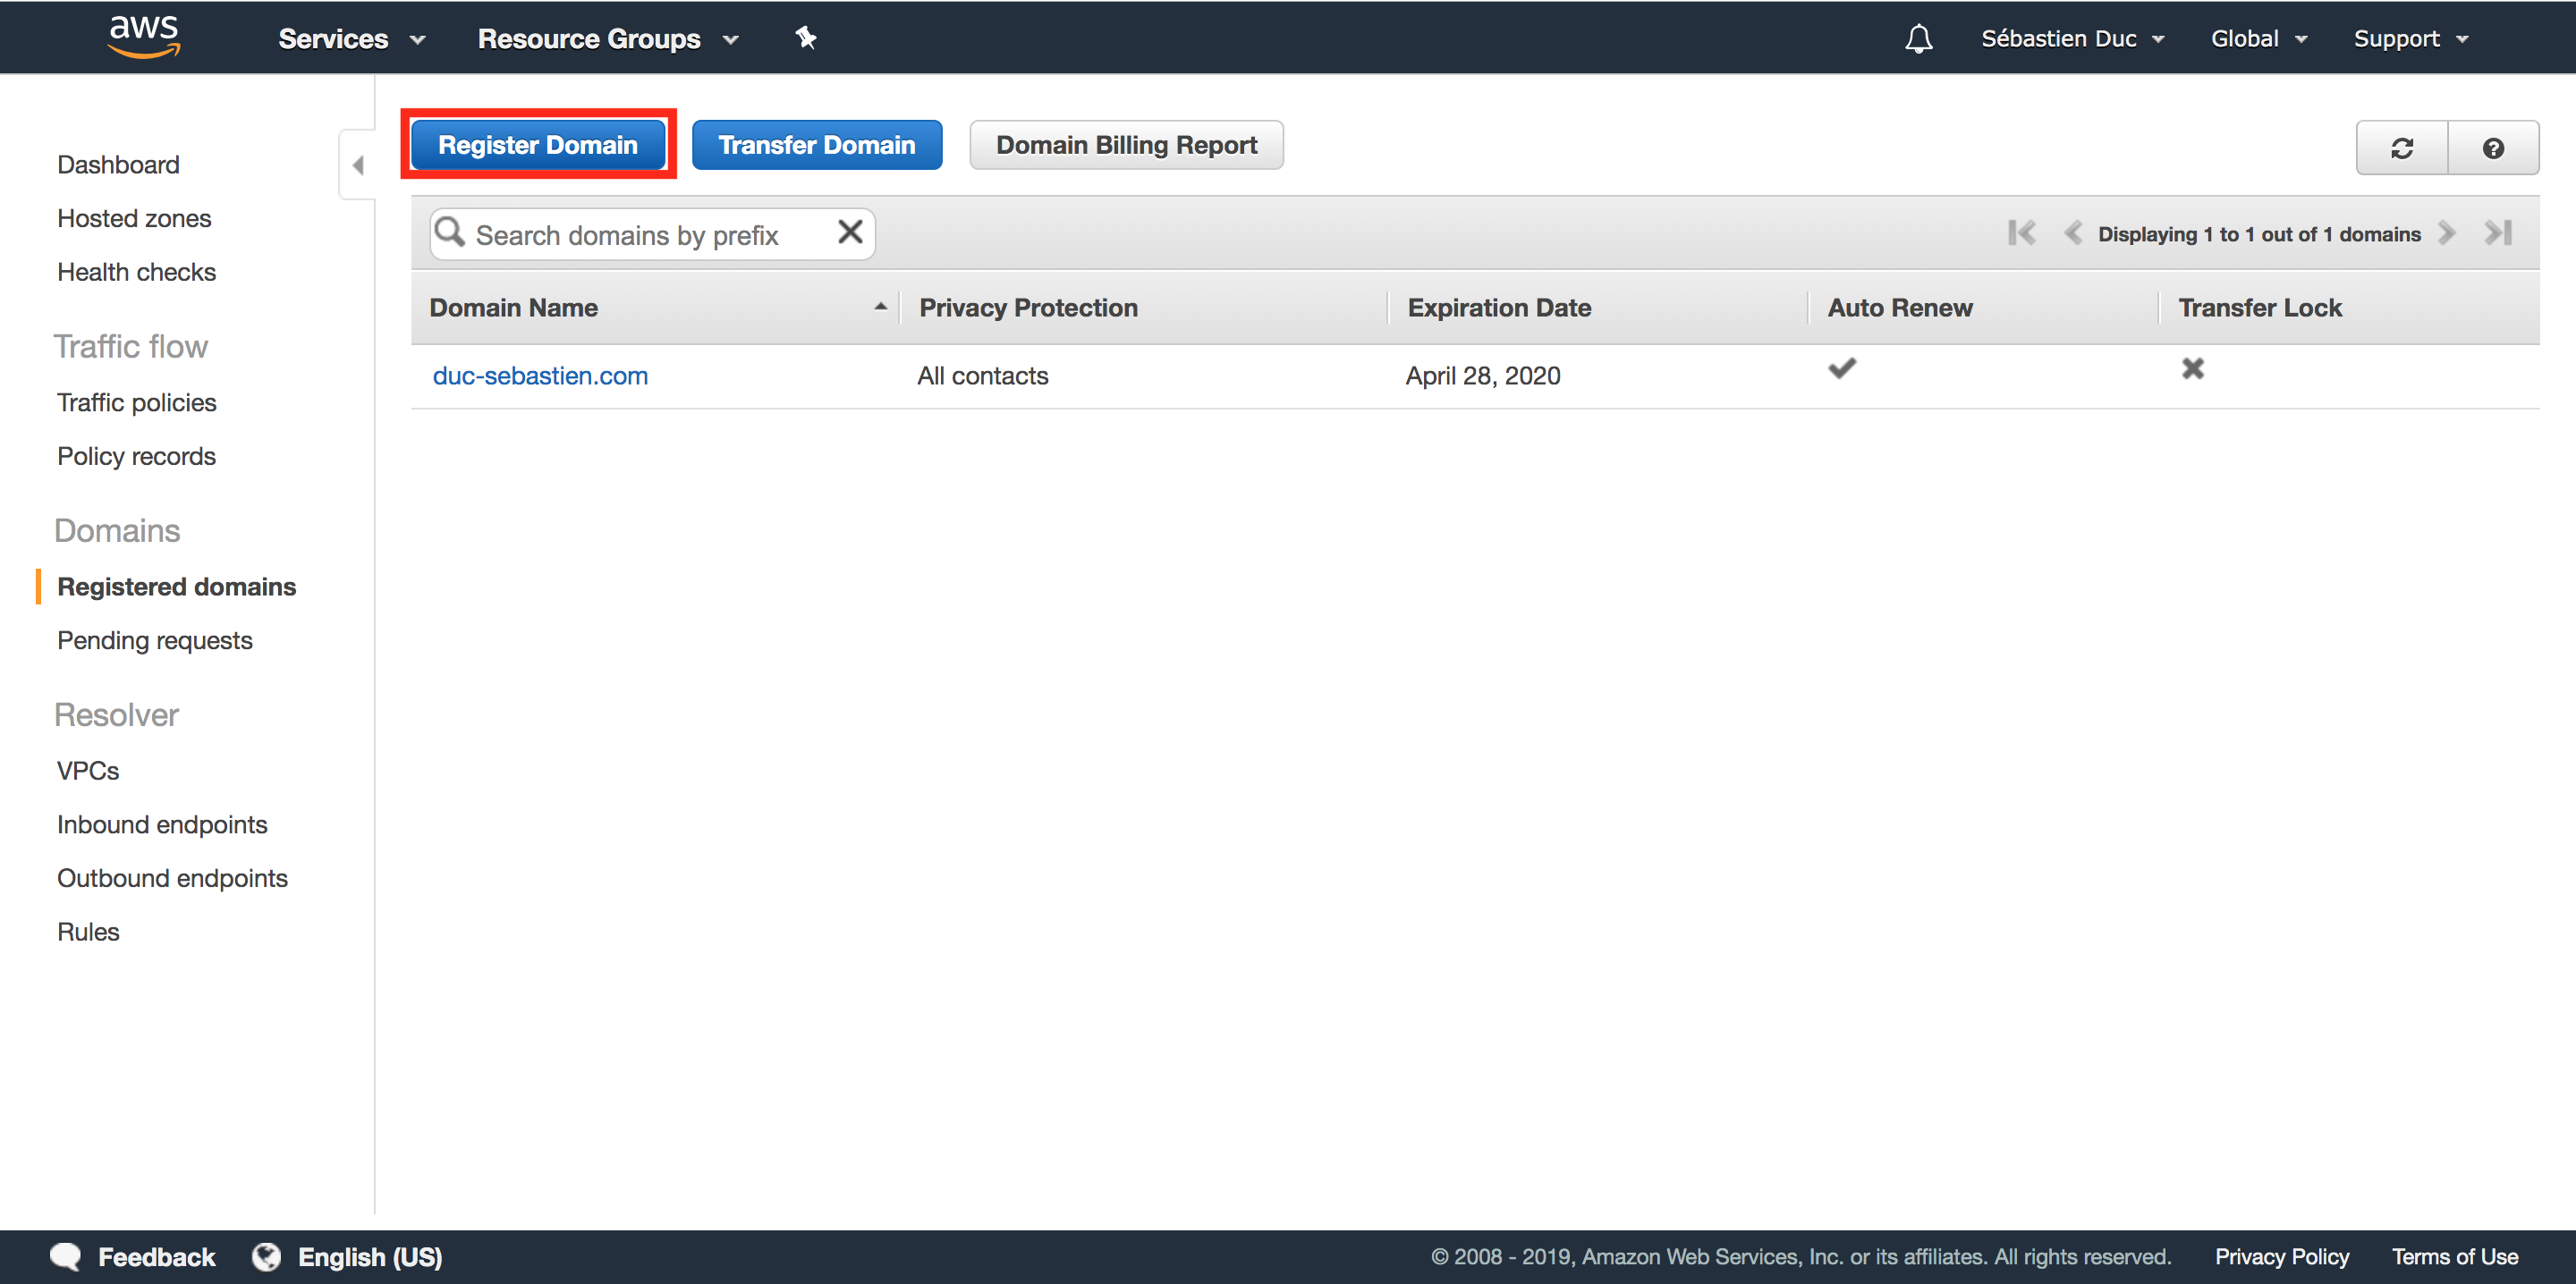
Follow the steps with your chosen domain name. I went for duc-sebastien.com.
Creating an S3 Bucket
You need to create an S3 bucket which will host all the static content created by Hugo.
That is all the content that gets created in the /public folder when running hugo command in your repo.
Navigate to the S3 service and create a new bucket
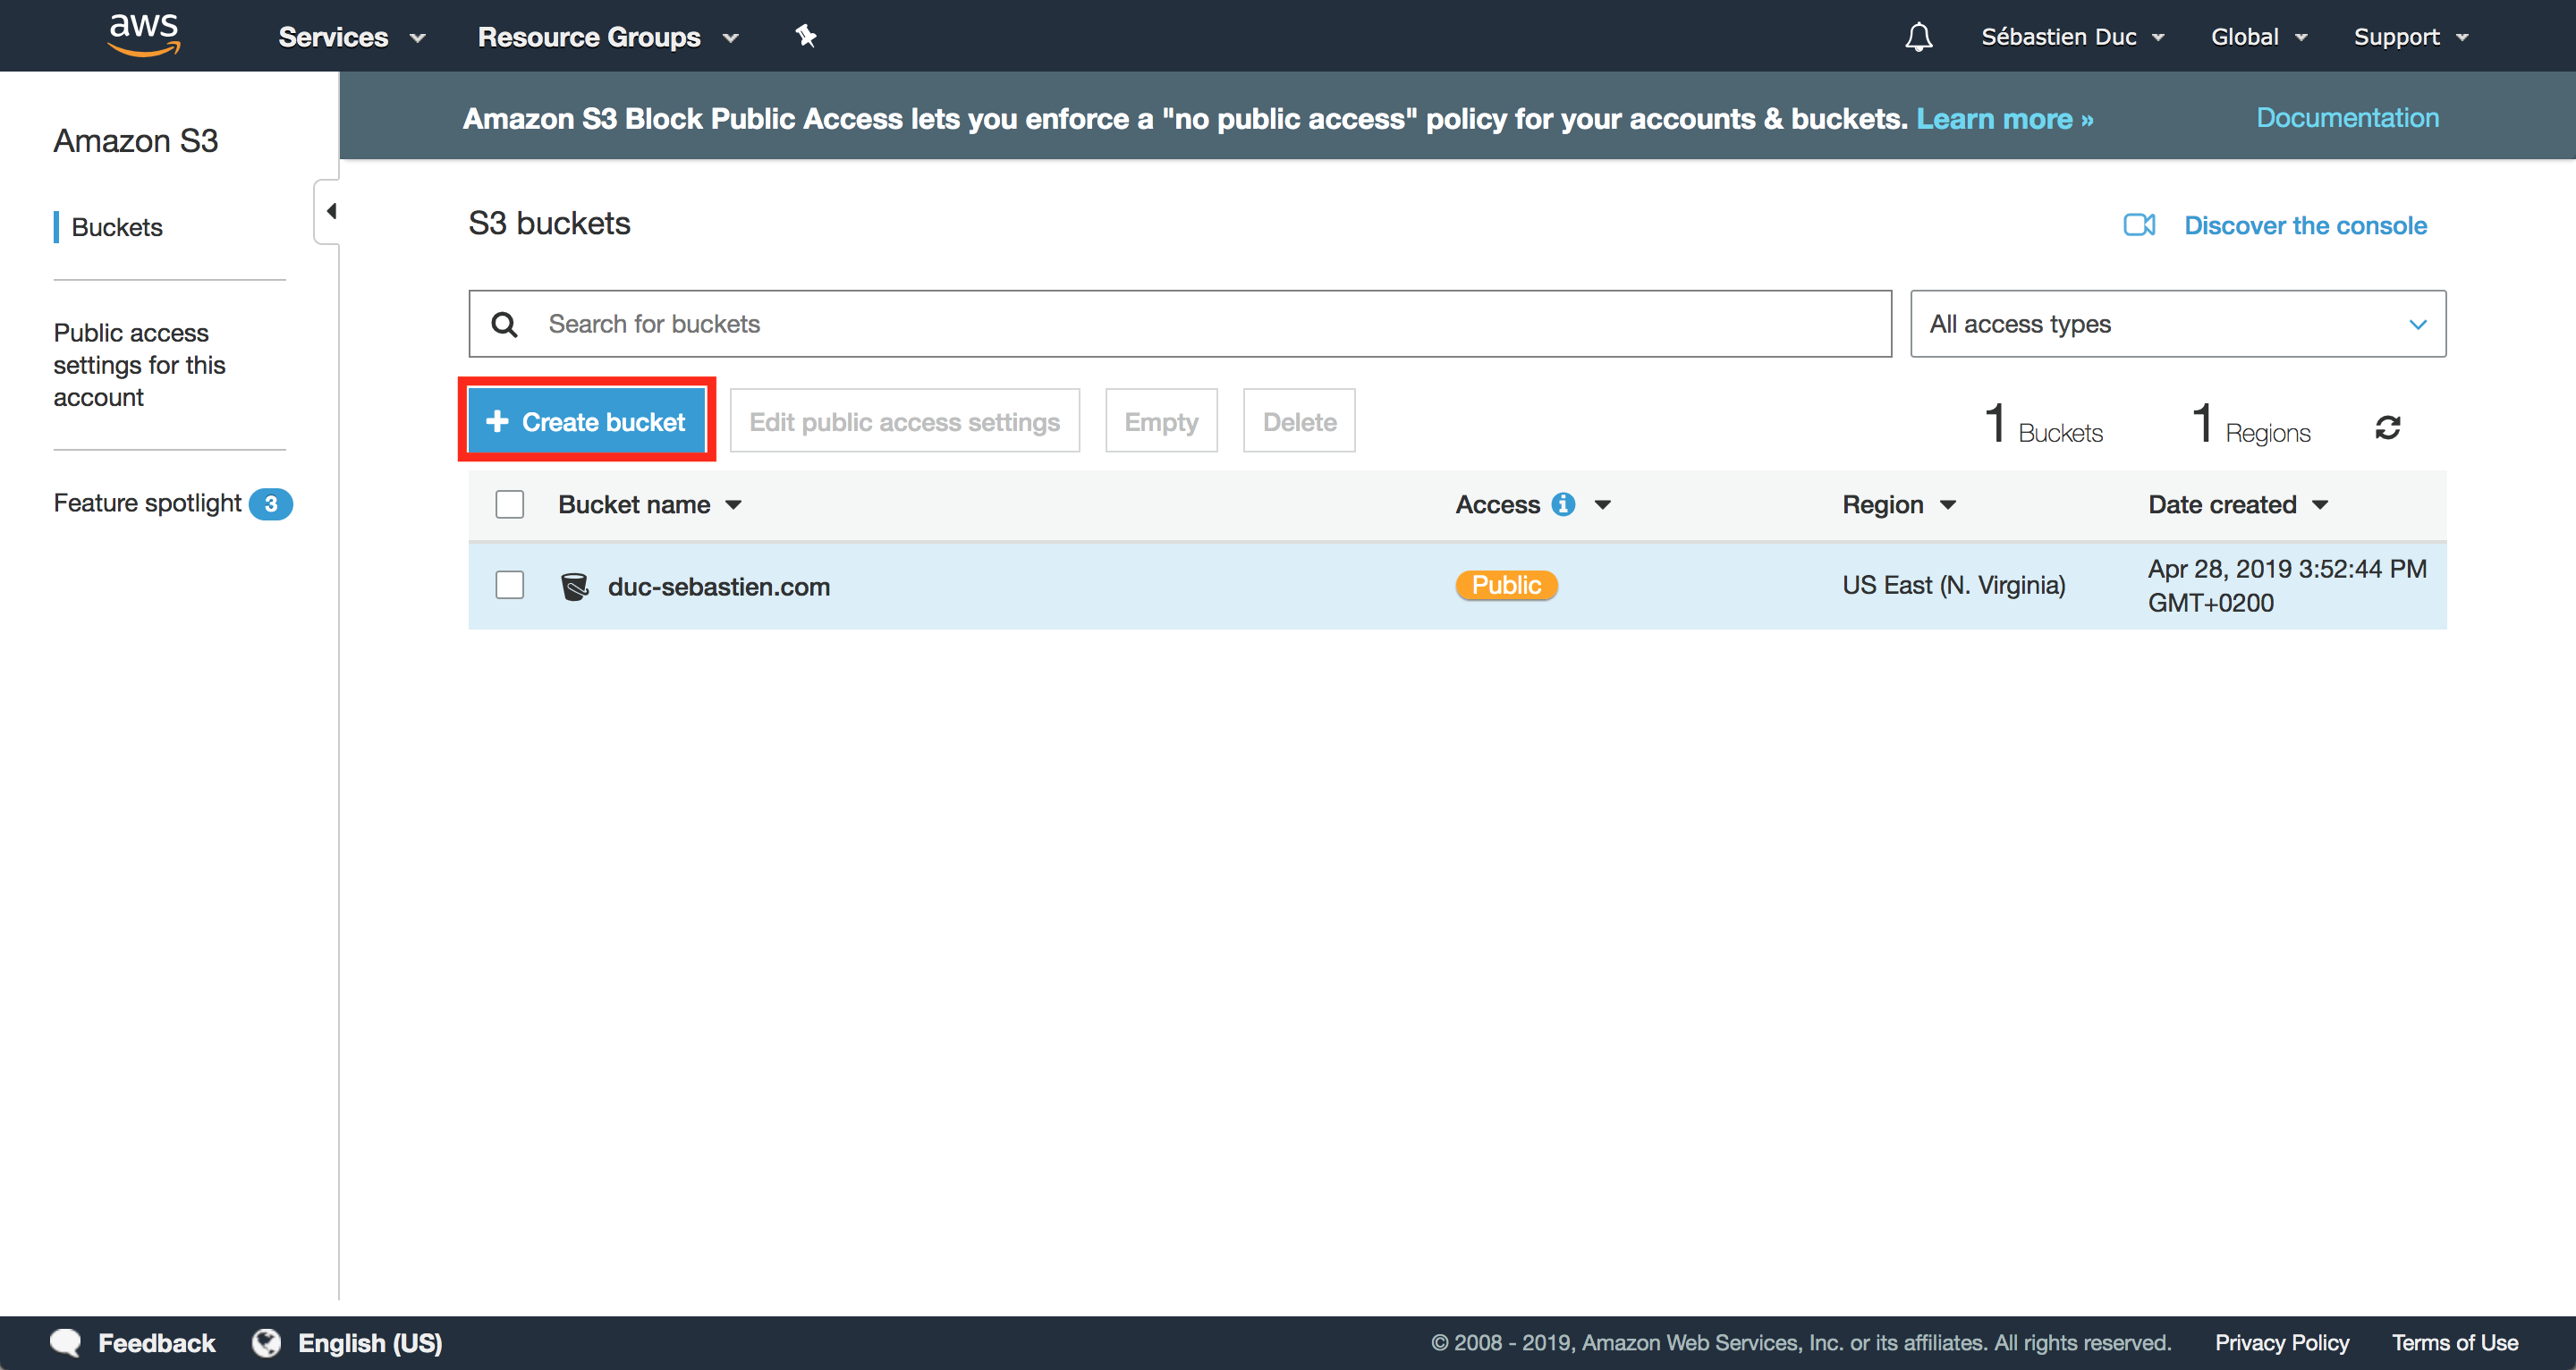
The bucket name should have the exact name of your domain name: in my case duc-sebastien.com.
 Note that it is complaining here on my screenshot that the bucket is already owned by me. That’s because I already created the bucket before making that
screenshot.
Note that it is complaining here on my screenshot that the bucket is already owned by me. That’s because I already created the bucket before making that
screenshot.
Press then next, then on configuring Options I just keep the default and press next. On Set permissions make sure to allow setting public policies on the bucket. We will have to apply a policy to allow anyone to read objects from the bucket.
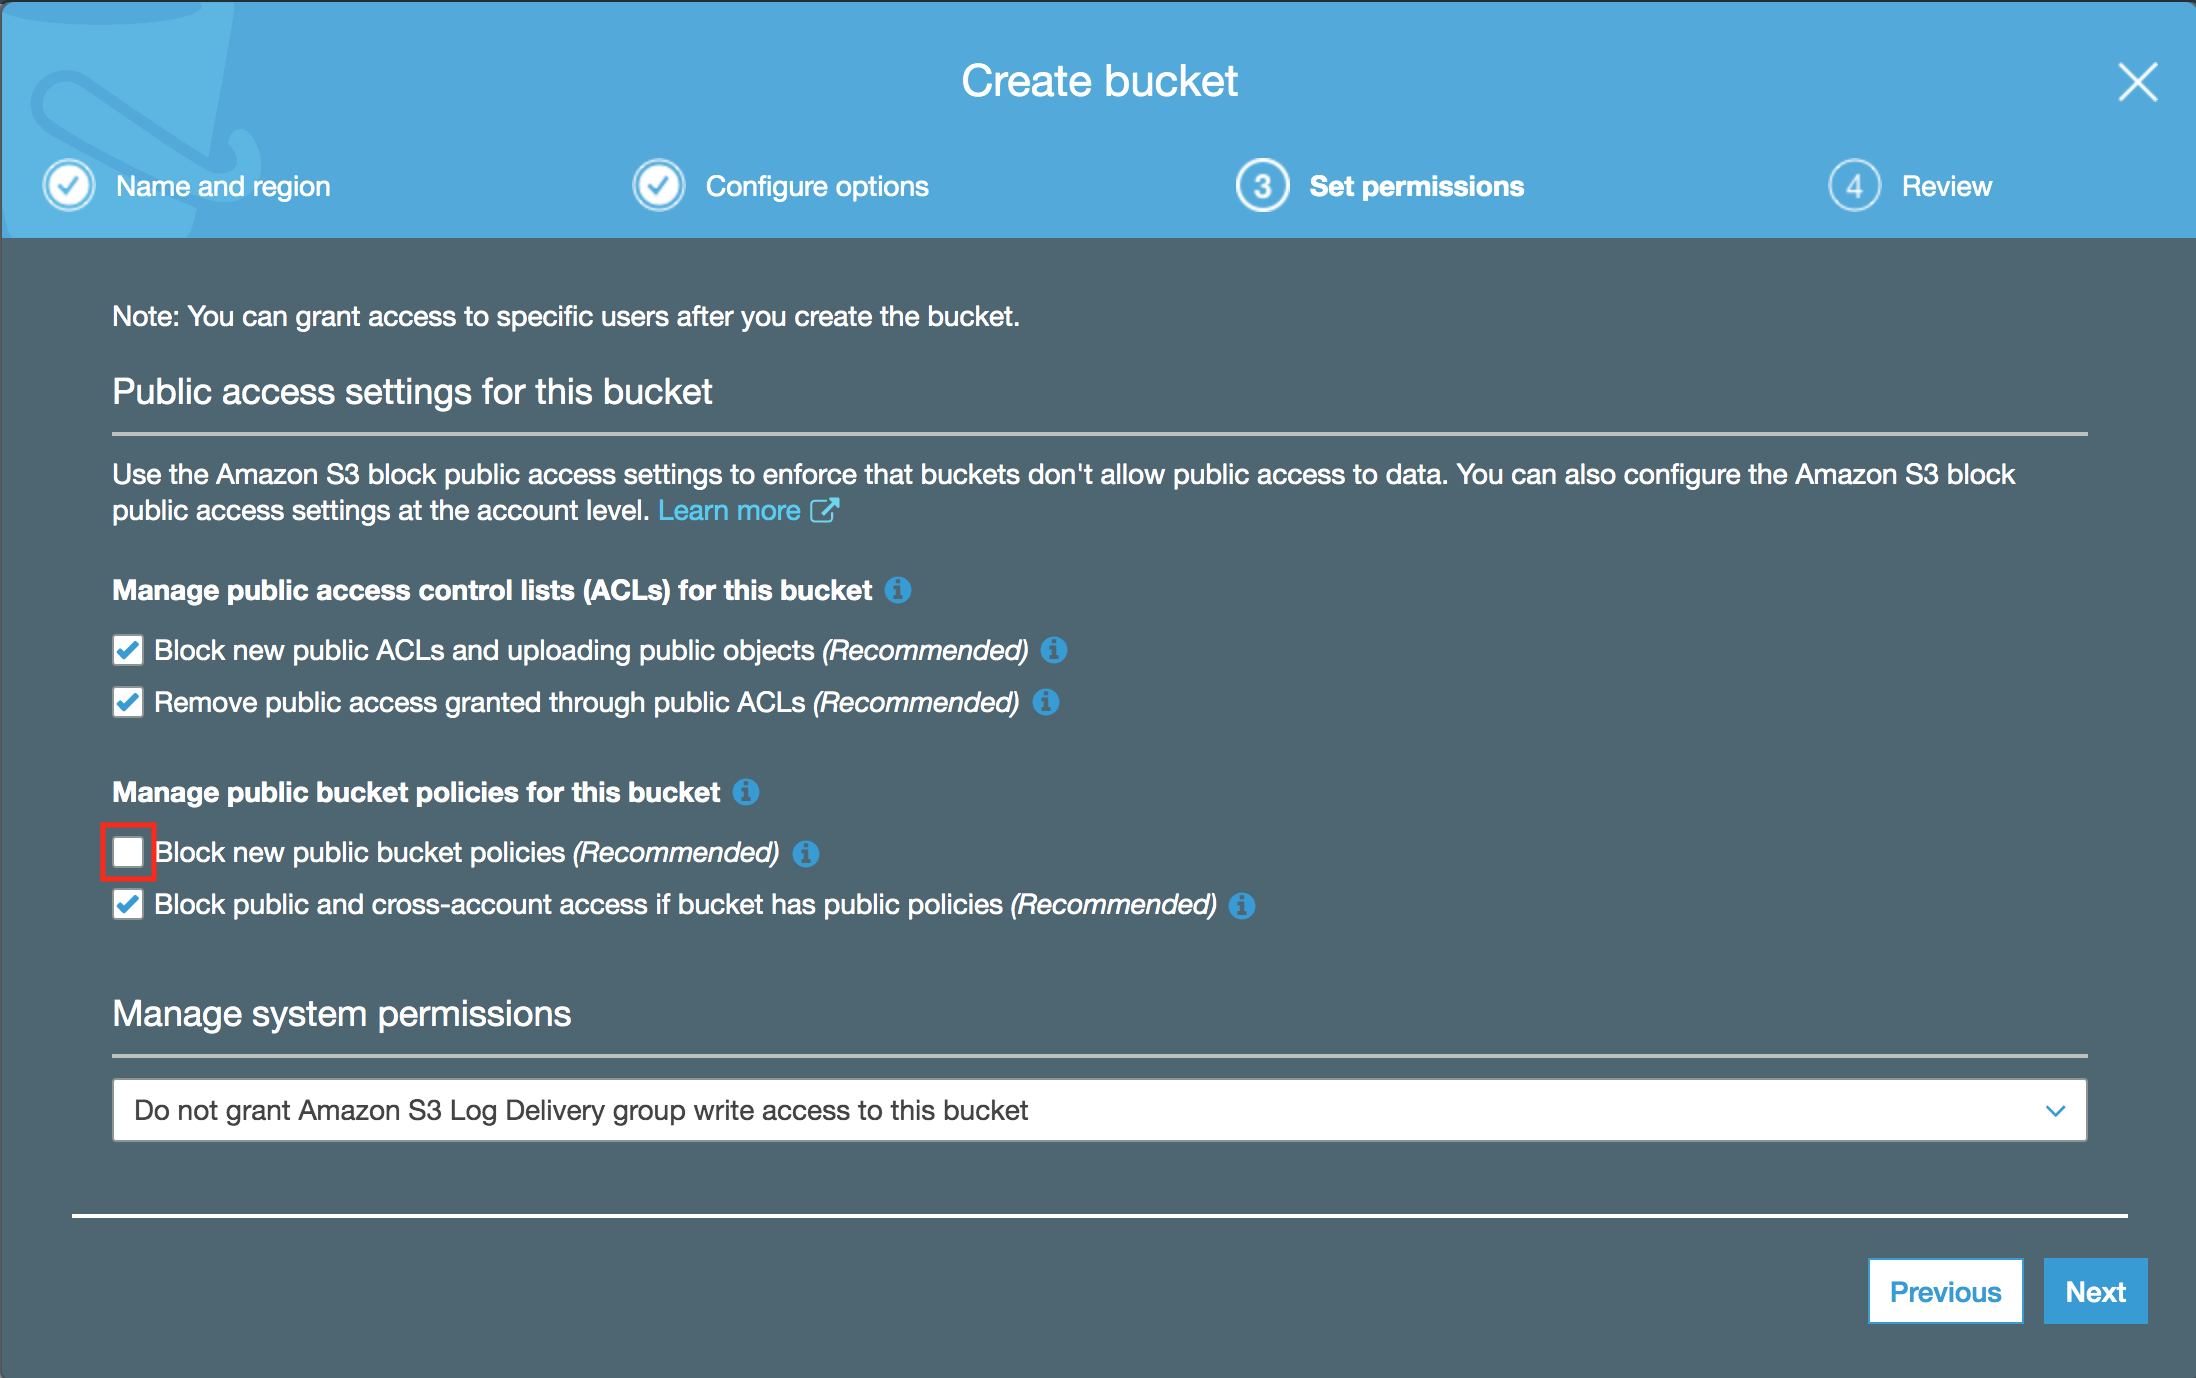
Then next, review and create the bucket.
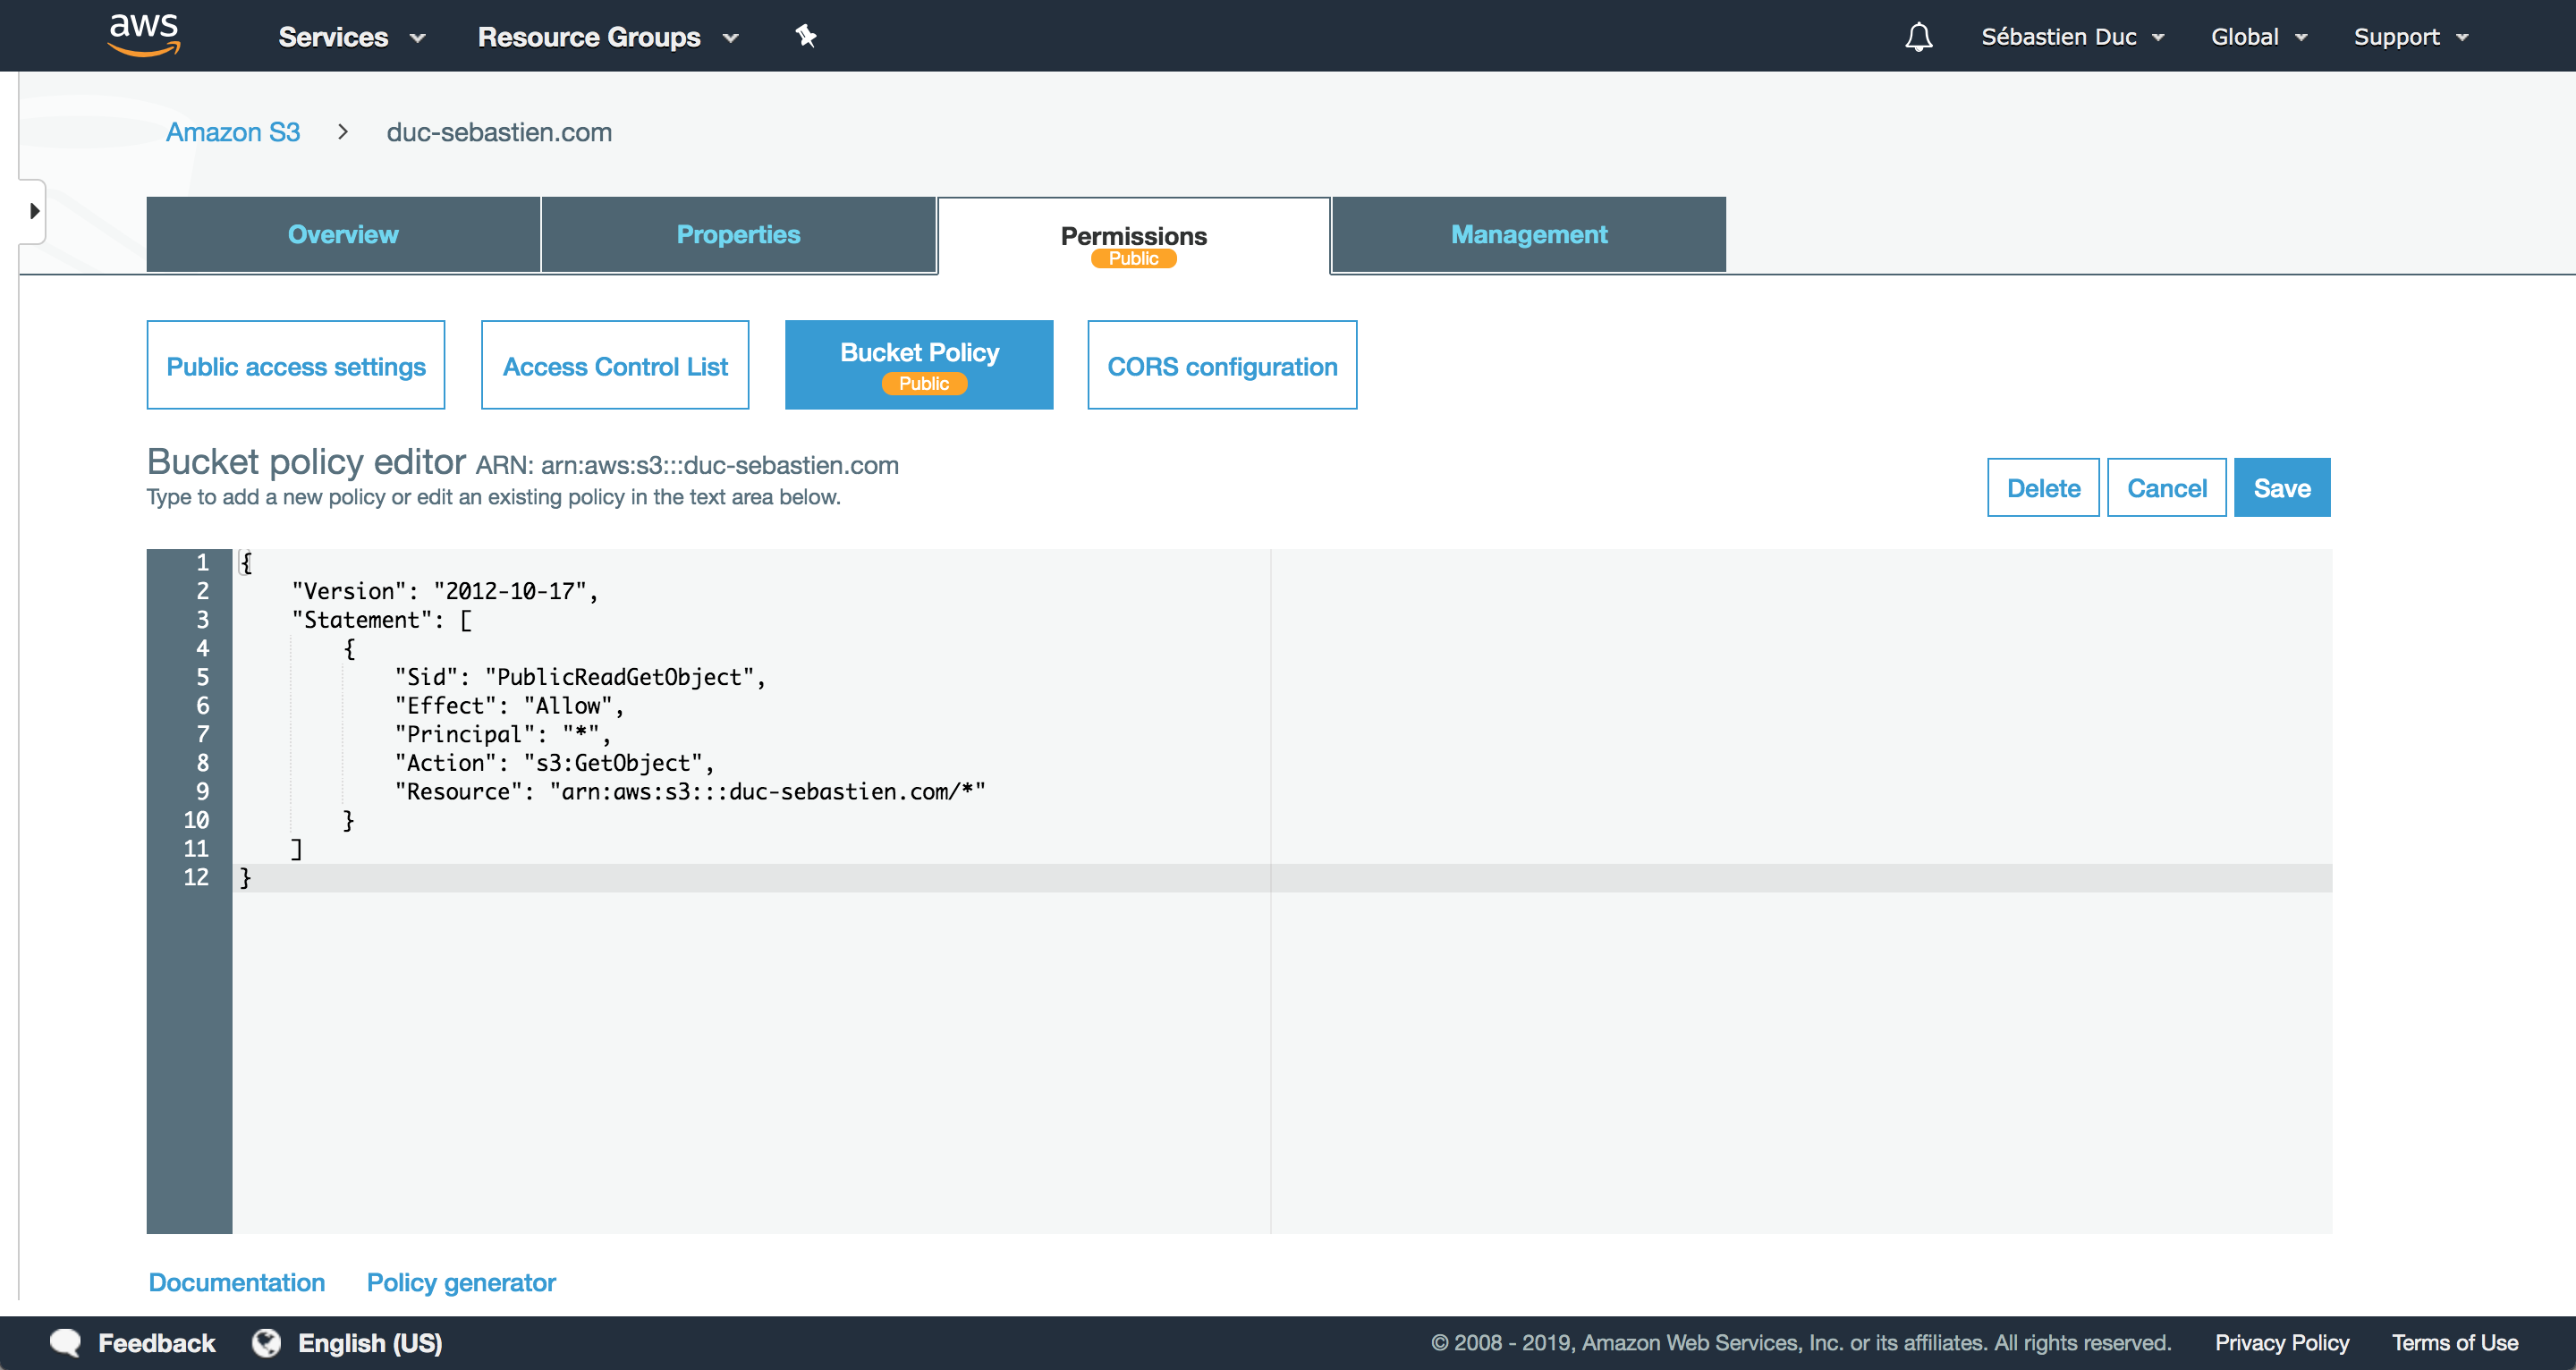
Now that the bucket is created, let’s set the policy so that anyone can read the content. Got the the permission tab on the bucket then bucket policy. Copy paste the following
{
    "Version": "2012-10-17",
    "Statement": [
        {
            "Sid": "PublicReadGetObject",
            "Effect": "Allow",
            "Principal": "*",
            "Action": "s3:GetObject",
            "Resource": "arn:aws:s3:::duc-sebastien.com/*"
        }
    ]
}
obviously replace arn:aws:s3:::duc-sebastien.com/* by your bucket ARN (Amazon Resource Name).
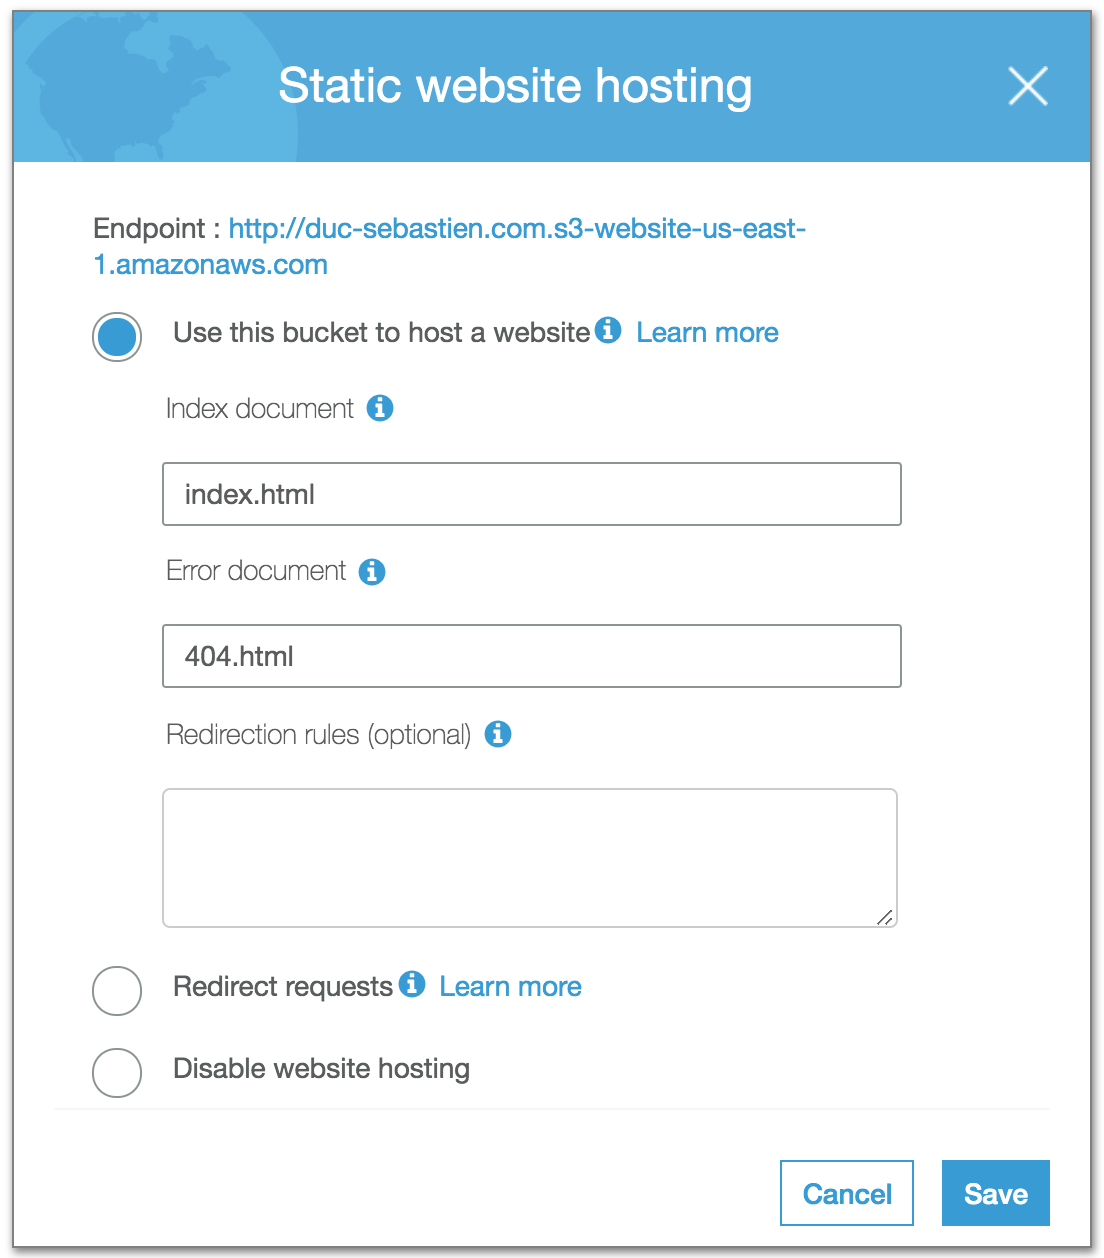
Now you need to Configure the bucket to be a static website. Go to the Properties tab on the bucket and then Static Web Hosting:

Upload the content to S3
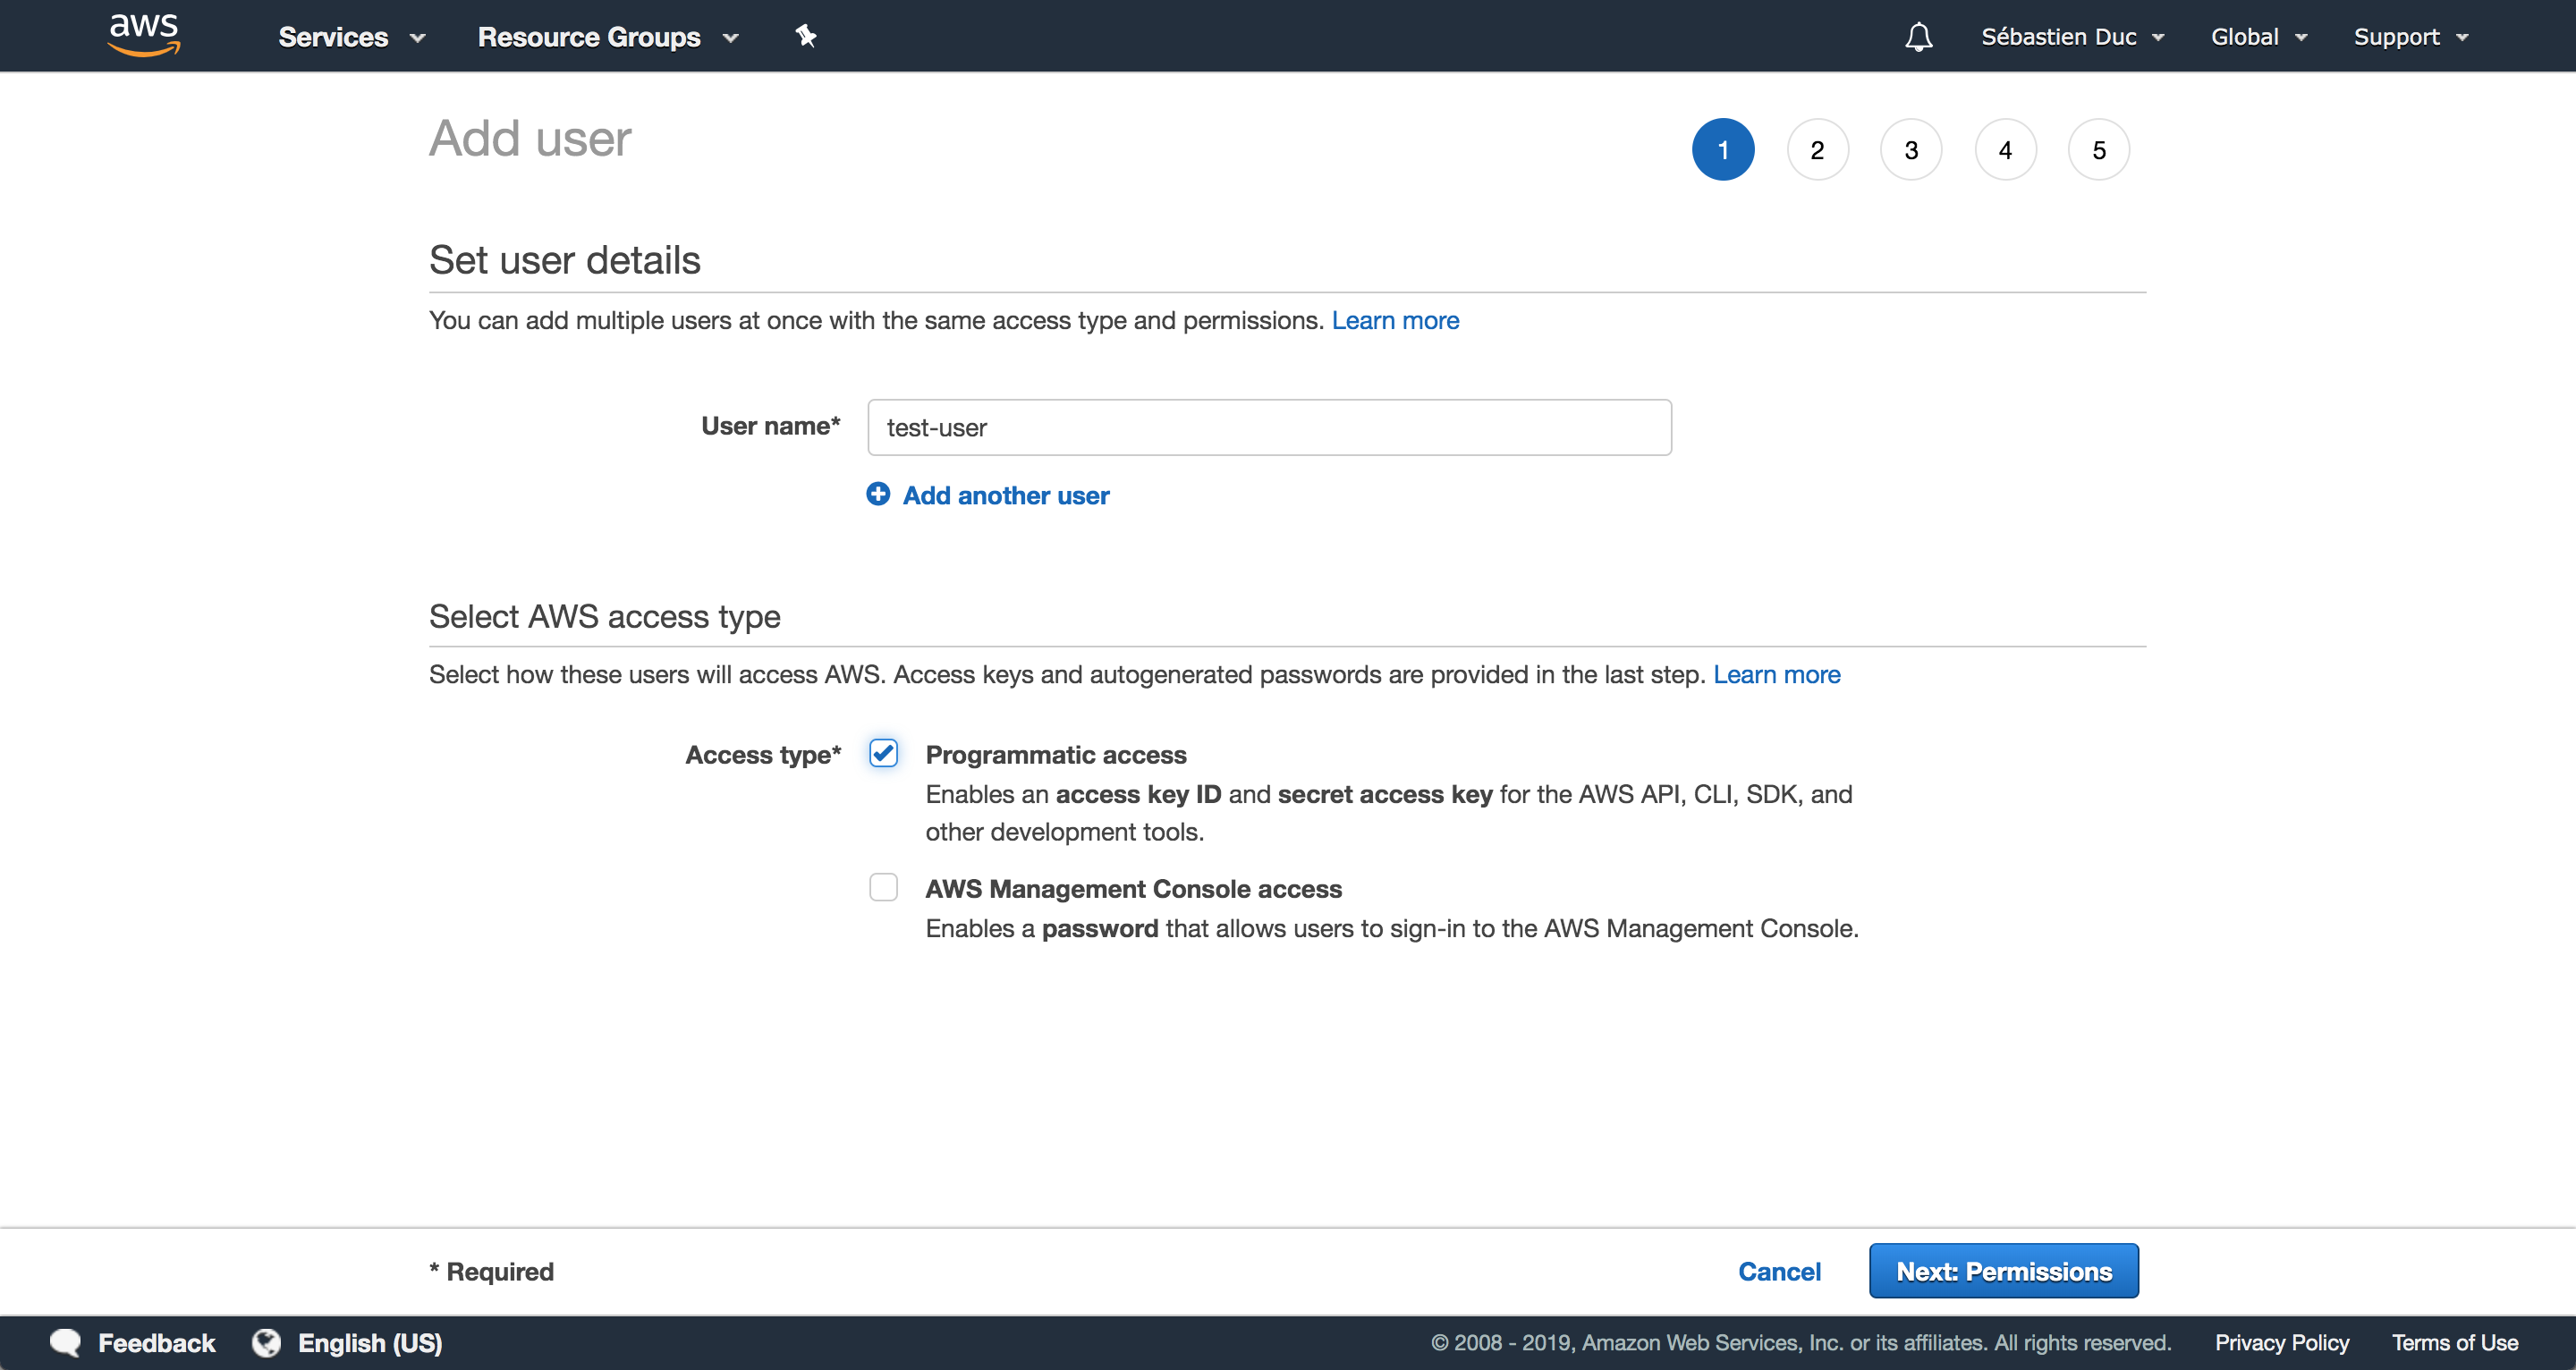
I created a special IAM user which I use in a script to upload the content to the S3 bucket. That IAM user only has write access to that bucket and that’s it. To create an IAM user navigate to the IAM service. You need to create a new user, I call it test-user and let AWS know that it will only have programmatic acces.
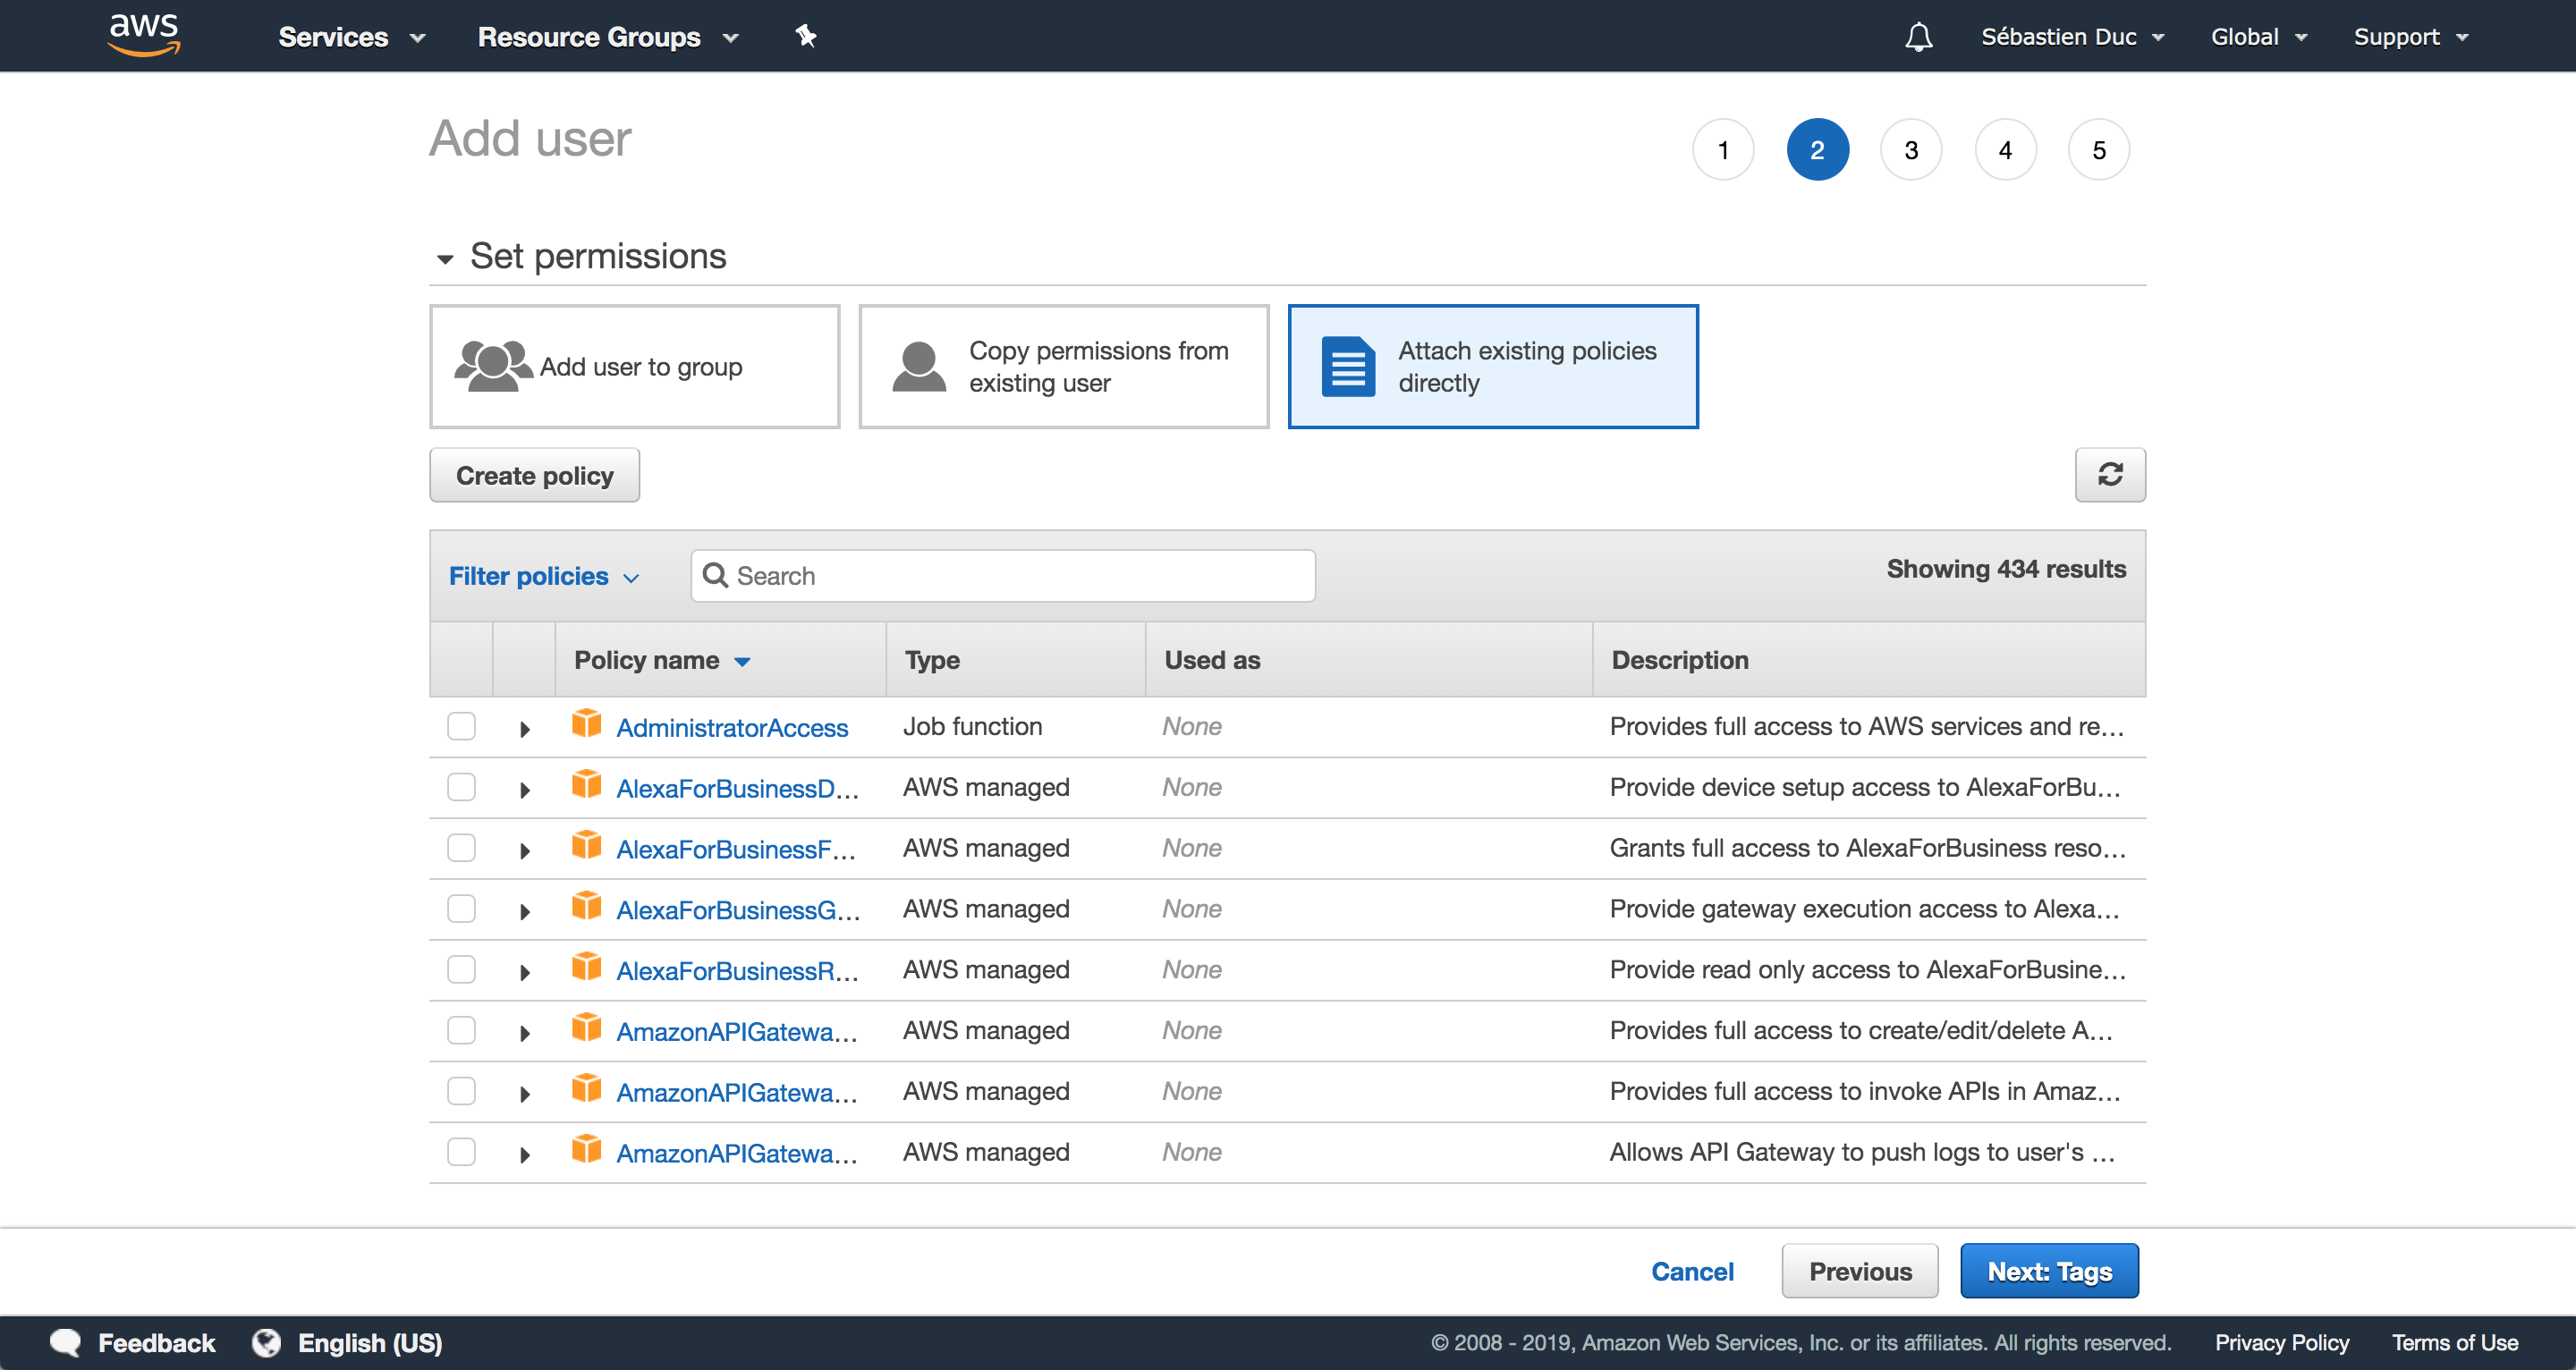
Then we set the permissions by chosing Attach existing policies directly. However let’s create a policy since we want to be very specific and only give access to the newly create S3 bucket.
Create the following policy:
{
    "Version": "2012-10-17",
    "Statement": [
        {
            "Sid": "ListObjectsInBucket",
            "Effect": "Allow",
            "Action": [
                "s3:ListBucket"
            ],
            "Resource": [
                "arn:aws:s3:::duc-sebastien.com"
            ]
        },
        {
            "Sid":
            "AllObjectActions",
            "Effect":
            "Allow",
            "Action":
            "s3:*Object",
            "Resource":
            [
                "arn:aws:s3:::duc-sebastien.com/*"
            ]
        }
    ]
}
and replace the ARN by your buckets ARN. Then attach that policy to the IAM user. You can also set the permission boundary with the same policy to ensure that this user only has access to the S3 bucket. Once the user created you should get credentials: an Access Key ID and a Secret Access Key. You need both to authenticate when uploading the content to the bucket.
I used the AWS Client. To install it on MacOS
brew install awscli
Then you can configure a profile for the newly created user
aws configure --profile <user name>
This will ask for the Access Key ID, the Secret Access Key, the region.
AWS Access Key ID [None]: <Access Key ID>
AWS Secret Access Key [None]: <Secret Access Key>
Default region name [None]: us-east-1
Default output format [None]: json
In my case the region is us-east-1 but this depends where you created the S3 bucket.
Once AWS cli is configured you can copy all the content generated in the public folder to the S3 bucket.
aws s3 cp --profile duc.sebastien.com public/ s3://duc-sebastien.com/ --recursive
Make sure to repalce duc.sebastien.com by your profile name you created and s3://duc-sebastien.com/ by your bucket name.
Great now your buckets has the website content.
Configure the DNS
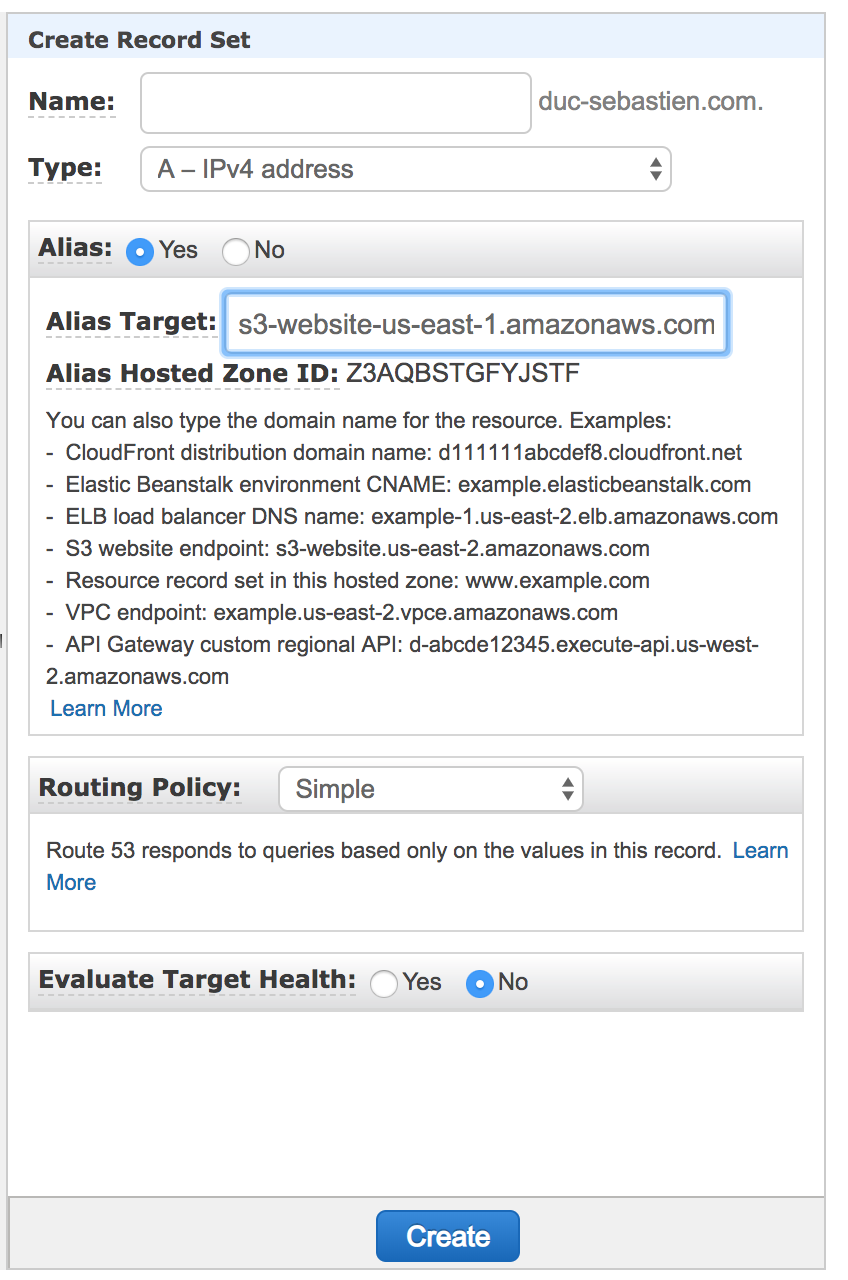
Let’s go back to Route 53 and configure the DNS so that duc-sebastien.com gets alias to the buckets url. Go to the Hosted Zone for your newly created Domain Name, it should have been automatically created. There you need to create a new Record Set, leave the default Name, Type should be IPv4, Alias should be set to Yes, Alias Target should be your S3 bucket, the rest can be left to default.
Congratulations, now you should be able to type yourdomainname.com in the browser and it should show the hugo website you created.
3. Continous Delivery
In this section we will see how to setup Circle CI to automatically publish the content to the bucket.
First create an account on CircleCI (it is free!). I linked it with my GitHub account.
If you setup the GIT project to be hosted on Github, circle should now automatically discover your github repo.
You can setup the project on Circle.
Once that’s done, create a .circleci/config.yml file in your Github repo with the following content
version: 2.1
orbs:
  aws-s3: circleci/aws-s3@1.0.8
commands:
  hugo-build:
    steps:
      - run:
          name: "Install Hugo"
          command: |
            wget https://github.com/spf13/hugo/releases/download/v0.55.0/hugo_extended_0.55.0_Linux-64bit.tar.gz &&
            tar xzf hugo_extended_0.55.0_Linux-64bit.tar.gz &&
            sudo mv hugo /usr/bin/hugo &&
            rm hugo_extended_0.55.0_Linux-64bit.tar.gz LICENSE README.md
      - checkout
      - run:
          name: "Run Hugo"
          command: hugo -v --debug
      - run:
          name: "List"
          command: ls -lR public

  s3-deploy:
    steps:
      - aws-s3/sync:
          from: public
          to: 's3://duc-sebastien.com/'
          overwrite: true
jobs:
  build:
    docker:
      - image: 'circleci/python:2.7'
    steps:
      - hugo-build
  deploy:
    docker:
      - image: 'circleci/python:2.7'
    steps:
      - hugo-build
      - s3-deploy

workflows:
  version: 2.1
  build-and-deploy:
    jobs:
      - deploy:
          filters:
            branches:
              only: master
Make sure to replace the name of the s3 bucket to yours.
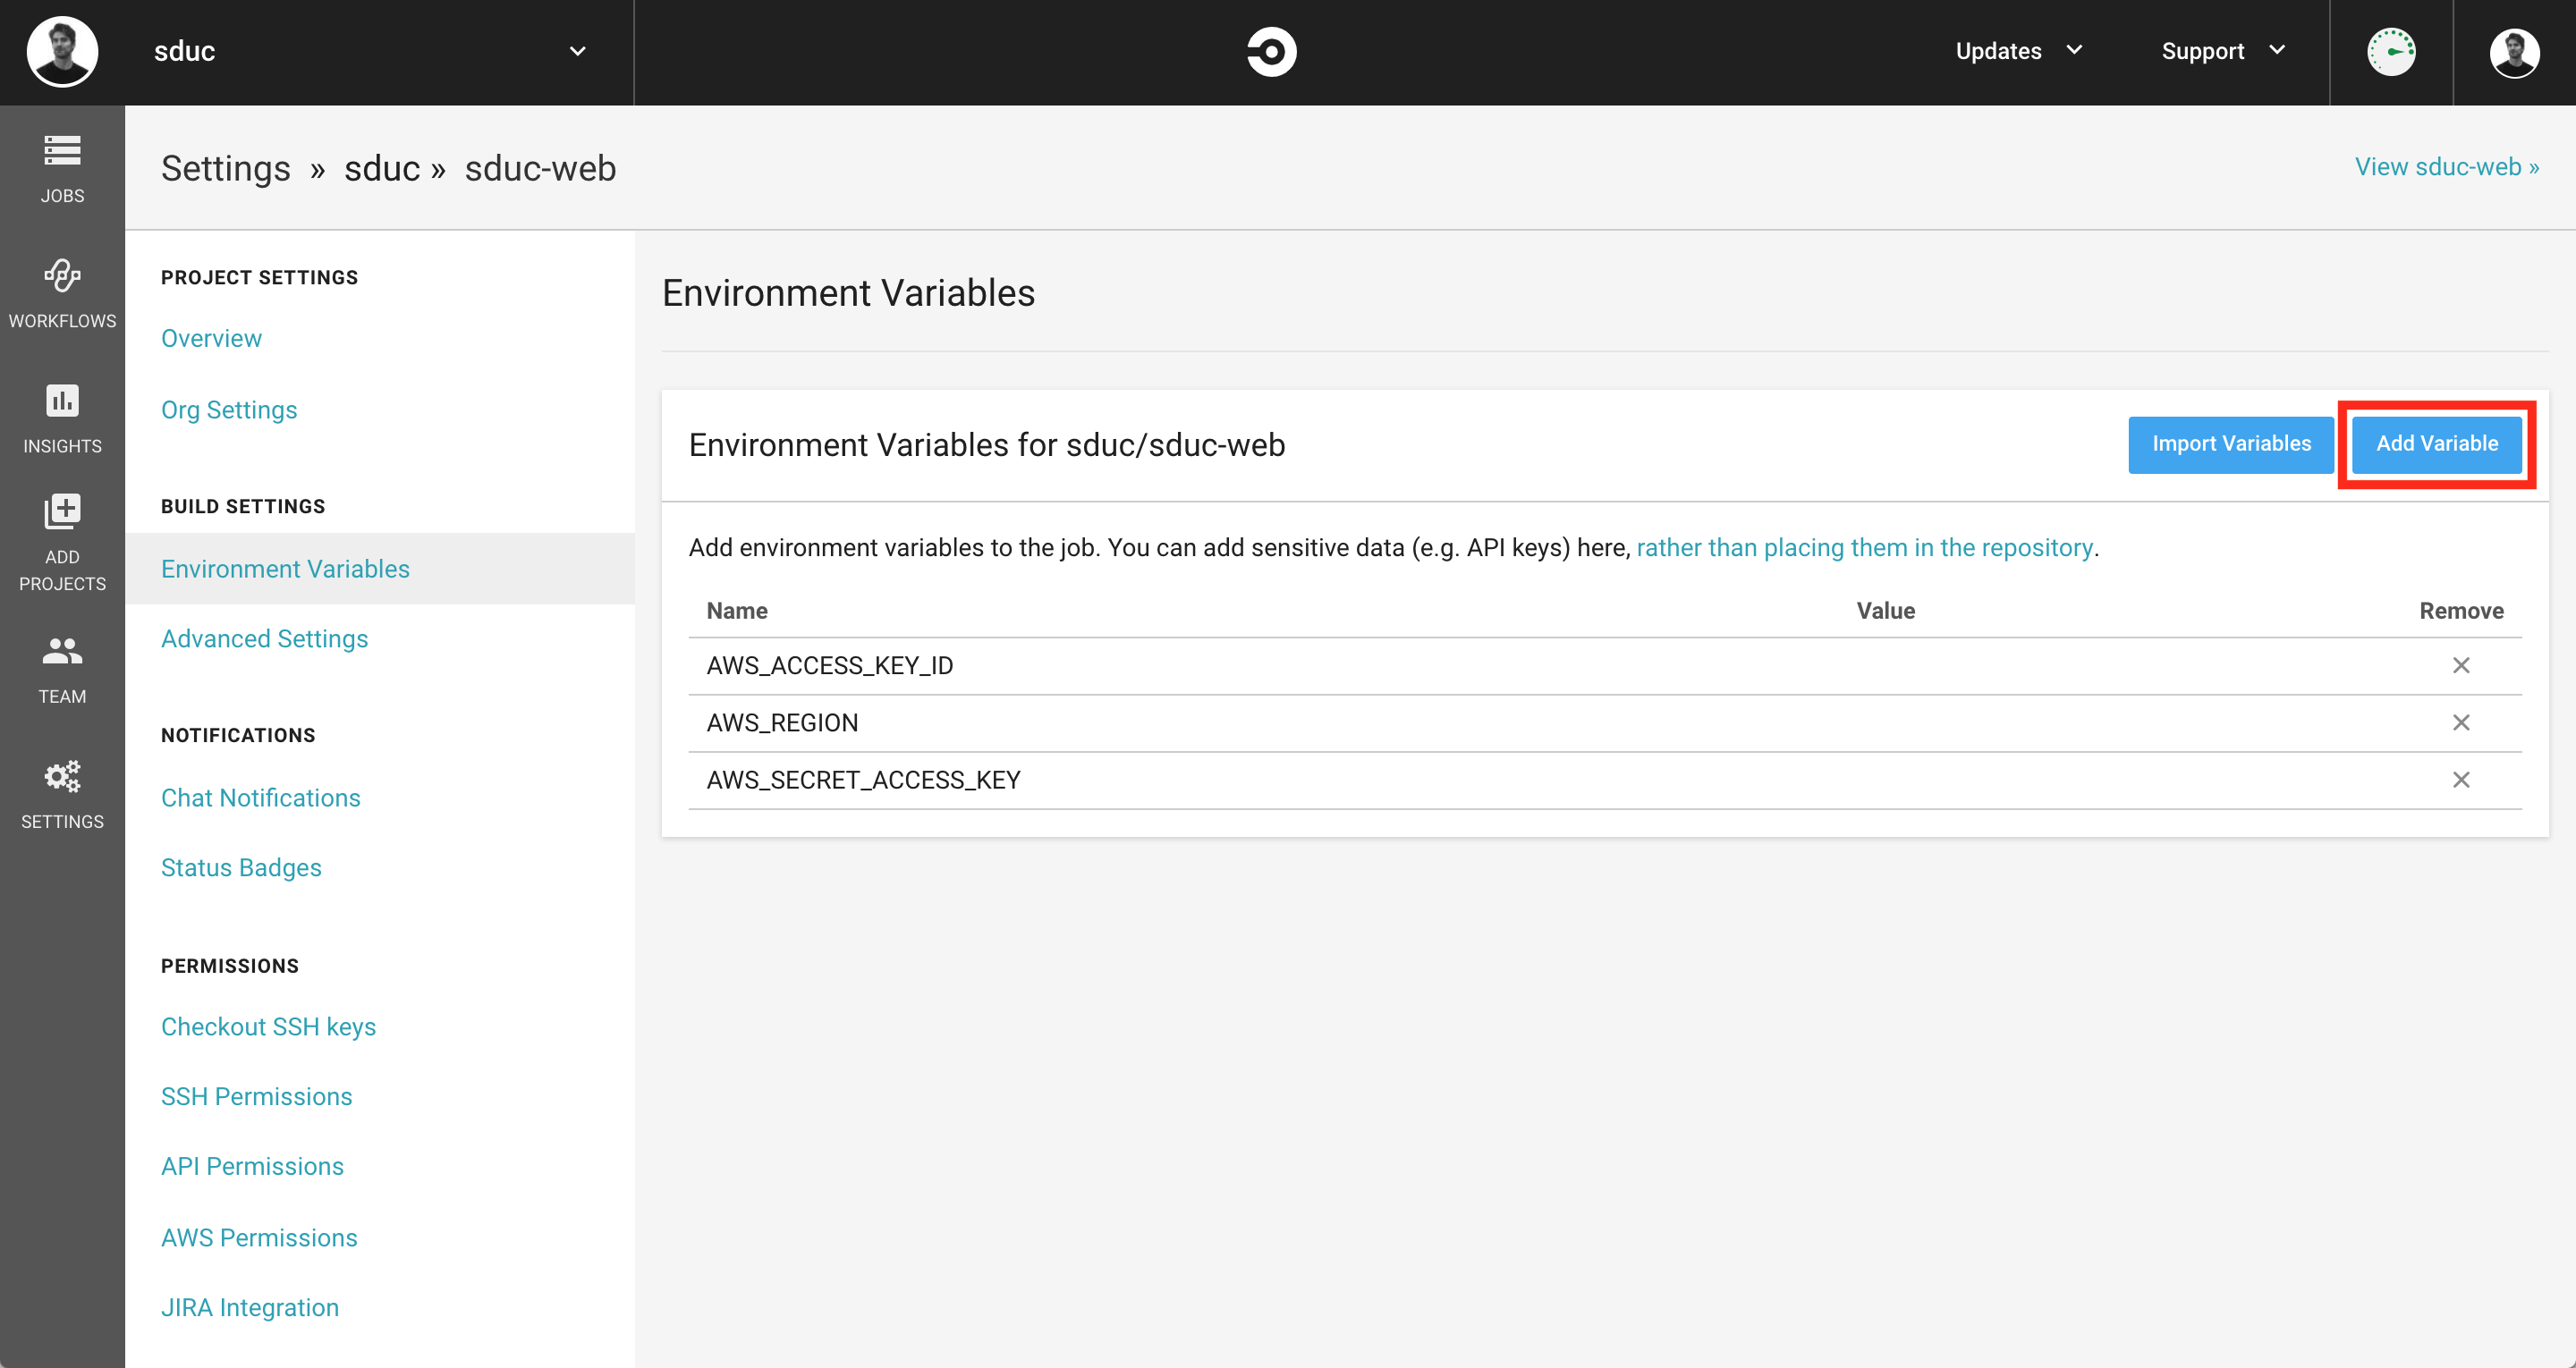
This circleci config is using the AWS S3 orb. This assumes you setup a few environment variables on the circleci project.
Go to the project setting, then Environment Variables: https://circleci.com/gh/<user-name>/<project-name>/edit#env-vars
Create three environment variables, AWS_ACCES_KEY_ID which should be equal to the previously create Access Key ID for the IAM user,
AWS_SECRET_ACCESS_KEY and AWS_REGION which should be equal to the region in which you created your bucket.
Congratulations, now everytime you commit to master, your S3 bucket should be updated accordingly with the new content you committed on the repo.
References
[1] gohugo.io